SECTION D37 - TASK 37
UCS & the Z direction. Construction methods with 3D CAD modelling.


Task Thirty Seven
Restore Ucs 7 (Not view 7) using UCS > R > 7 > This is the start for positioning a circle in the centre of the layer 03 angled face. An easy method of construction is to create a line from diagonal corners on the face and place a circle with radius 10 (0.4 ins) at the mid point. Fig Tsk 37 shows the diagonal line.
Copy the circle -10 (-0.4) in the Z direction using @0,0,-10 (0,0,-0.4) for the second point of displacement and then erase the diagonal construction line. A 30 degree point is needed on the buried circle to represent a blind drilling.
Note
Constructing the drilling point will pose some difficulty because the Ucs will need to
be in two planes at one time. i.e. In the circles' plane - depending on the revision
being used - to pick a quadrant, and in a horizontal plane to draw a line at 30 degrees.
Since the Ucs cannot be in two planes at once, the steps below and the corresponding
steps in fig TSK 37 show one method of construction. Once you have completed the drilling,
think about alternative construction methods. Thinking about construction methods in this
way is very common with 3D CAD modelling - it becomes easy with practice.
Remaining in the current vertical Ucs plane:-
Step 1. Create a cross in the center of the buried circle using its quadrants.
Step 2. Set the Ucs to horizontal by rotating it minus 90 with the X option. (The
first panel of Task 6 to revise Ucs.)
Step 3. Construct the point of the hole in the horizontal plane by:-
a. Drawing a line starting from the newly defined left hand end point of the cross within the circle.
b. Complete the line by using the polar co-ordinates of "@LL<AA"(LL represents
a length value and AA represents an angle value.)to achieve the degrees line construction
method. (See fig TSK 37 for the "@LL<AA" values. Now create the second line from the right
hand end and notice that FigTsk37 shows step 3 in 2 places.)
Step 4 may require using the Undo command. Depending on the revision being used, the Fillet command might not give the intended results.
Step 4. Use "Fillet 0" to join / trim the line ends at the point. Do it while the Ucs is still horizontal. (If the fillet command fillets the unwanted parts of the line entities, Undo the fillet and read on.)
Note
AutoCAD can often misinterpret entity picking in free space. The solution to the situation is to
perform the command while the view is in a projection perpendicular to the active Ucs plane. In
this case, the plan view (view name "1") is perpendicular to the current Ucs. Fillet the
entities as follows:-
Restore View "1" and perform the Fillet. Zoom Prev
to return to the pictorial view. (Restoring view 71 will also return the pictorial view.)
Step 5. Copy the two lines that currently define the point, onto themselves. Set the Ucs to its previous vertical location by using UCS, R, 7. (Some software releases allow the user to choose "P" - for "previous" - instead of 7.)
Step 6. Use the "Rotate" command to rotate the copied entities from step 5 (that represent the drill point) by 90 degrees about the circle centre. Use the redraw or regen command to show all the entities. Erase the cross created in step 1 from the centre of the circle.
Step 7. Join the quadrants of the two circles to represent a cylinder. i.e. Top quadrant of circle 1 to top quadrant of circle 2, then the bottom quadrant of circle 1 to bottom of circle 2 etc. Finish with a zoom all.
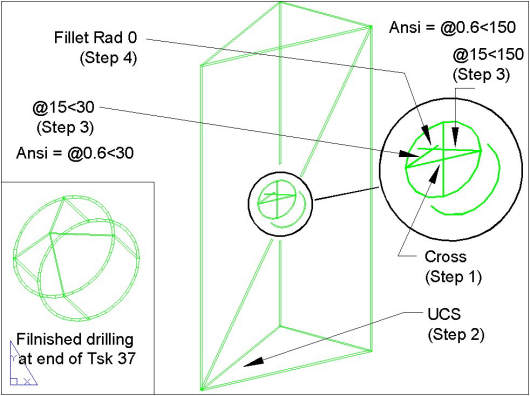
Fig Tsk 37. Steps for creating a representaion of a drilled hole.
Restore view names 1 - 3 (see task 5) to see the results in projection. Since one face is at an angle, the drilling will appear elliptic in two of the views. Turn on ALL the layers and return to view 71 before starting the next task.
Please feel welcome to make use of the free resources at the side and bottom of these webpages. Many of them contain very useful 3D CAD material.


